Sunday, March 12, 2017
CLEO Gold V1 1 0 Apk ROOT
CLEO Gold V1 1 0 Apk ROOT
kali ini saya akan share aplikasi CLEO Gold v1.1.0 Apk secara gratis, karena kalo di Play Store harus bayar Rp. 32.903,- :v aplikasi ini untuk menginstal script cleo game GTA III,GTA VC, dan GTA SA. aplikasi ini membutuhkan ROOT untuk bekerja.

* SA
- car spawner - features all of game cars, bikes, boats, planes and helis, has inbuilt vehicle preview
- cheats - features all standard and bonus cheats, including mission skip one
- mission selector - allows to start any scenario mission you want
- passenger - allows player to enter any traffic vehicle and perform driveby
- first person driving - allows to activate 1st person view in any vehicle while driving
- full stats - boosts all player stats to the maximum
- health regen - constantly regenerates players hitpoints
- fight master - player will use different fighting styles in melee combats
- flying - allows player to fly like a super-man
- unlimited jetpack - removes the height limit for jetpack
- open houses - allows player to visit any house, like in burglary missions
- car balance - players car have an ability to prevent fllipping
- car boost - allows you to speed up your car via power widget while driving
- radio fix - fixes the glitch which causes some radio stations to play only commercials
* VC
- car spawner - features all of game vehicles
- cheats - features all standard cheats
- health regen - constantly regenerates players hitpoints
- all weapon - gives an ability to have all weapons at once
* III
- car spawner - features all of game vehicles
- cheats - features all standard cheats
- health regen - constantly regenerates players hitpoints


App Information
Name : Cleo GOLD
Version : 1.1.0
Developers : AlexanderBlade
Size : 500kb
Root : yes
Link : >>>DOWNLOAD<<<
Untuk cara menggunakannya bisa melihat video di bawah ini :)
Available link for download

How to successfully root your Tecno Camon C9 in easy steps
How to successfully root your Tecno Camon C9 in easy steps
Rooting is a process of gaining privileged control (known as root access) over various Android subsystems. Android rooting opens up a world of possibility, but it can also void your warranty, or even leave you with a bricked device. So today, we’re going to be taking about how to root this phone “Tecno Camon C9”. One of the latest device from Tecno mobile, unveiled some couples of months ago, and was tagged the selfie king. The phone has been proving stubborn to root probably because it’s running on Android 6.0 Marshmallow. But all thanks to Hovatek Teamfor making this possible.

Requirements for the rooting process
?Your patience in following the steps involved
? Download CWM recovery image Ported by team hovatek
? Super SU.zip
?Fastboot and adb
? Unlocking the boot-loader of Tecno Camon C9 follow the steps here
Steps for Rooting Tecno Camon C9
1. Copy the downloaded Super SU to both internal storage of your phone and SD card.
2. Now extract and copy the CWM recovery.imginto the same folder as the fastboot.exe andadb.exe
3. You must have unlocked the bootloader of your Camon C9 or follow this steps to do so.
4. Connect the phone to your PC via USB cable while switched ON and boot it into Fastboot (as instructed in the Bootloader unlock guide step 3 above)
5. The moment your device enters fast boot, flash the recovery.img to the phone by typing this command below
fastboot flash recovery recovery.img
on your PC then pressing Enter.
6. Reboot the phone by typing the command below
fastboot reboot
then pressing Enter
7. Boot the phone into recovery mode by switching off and pressing Volume up button Power button all together
8. Once you enter recovery mode, use the volume button to move up and down
9. Scroll down to Install zip and select it
10. Select Choose zip from /storage/sdcard1
11. Navigate to the location of SuperSu.zip and select it
12. Select Yes – Install SuperSU to confirm flashing
Wait till the flashing is complete.
13. Return to the home screen (using the back option) then select Reboot
Note: If CWM offers to fix some errors, select No. Once you are done, confirm if your device has been successfully rooted by installing root checker.

Available link for download
root app xmod release 2 3 5 235 zip 11 MB
root app xmod release 2 3 5 235 zip 11 MB
Share app-xmod-release_2.3.5_235.zip - 11 MB
Available link for download
Saturday, March 11, 2017
Cara Root Semua Android Dengan Kingroot
Cara Root Semua Android Dengan Kingroot

Cara root dg kingroot
Pada postingan kali ini saya akan share cara rooted dg kingroot yg bisa sobat download di Google Play Store.dan hanya untuk versi android 4.4.2 .Langsung saja saya akan share tutorial cara root dg kingroot yg bisa sobat lihat dibawah ini.
Persiapan
1. Pastikan perangkat Anda memiliki daya baterai minimal 50% untuk menghindari shutdown saat proses.
2. Backup semua data ponsel termasuk kontak, pesan, aplikasi, dll.
3. Pastikan ponsel Anda memiliki akses internet selama proses rooting,
Cara Root Semua Android dengan KingRoot
1. Instal dan jalankan aplikasi Kingroot dan Anda akan melihat lingkaran hijau besar bertuliskan "ROOT"
2. Tekan pada lingkaran hijau besar untuk memulai proses rooting.
3. Kemudian tunggu proses rooting perangkat. (Pastikan internet anda Aktif).
4. Selanjutnya, Anda akan melihat tanda centang putih pada lingkaran hijau, yang menandakan proses rooting telah selesai. Anda juga akan melihat bar biru di bawahnya. Tekan di atasnya dan Anda akan melihat aplikasi KingUser!
5. Selanjutnya, reboot perangkat Anda untuk membuatnya lebih stabil.
6. Anda akan melihat aplikasi KingUser terinstall pada perangkat Anda yang memberikan Anda akses root dan merupakan indikasi bahwa perangkat Anda telah berhasil di root. Aplikasi ini seperti SuperSU Root Manajemen.
Screenshots

Selamat! Perangkat Anda baru saja di root
Cara Unroot Android dengan KingRoot
1. Buka KingRoot.
2. Kembali ke Pengaturan Dan Pilih Remove Root Permissions.
3. Popup akan muncul. Pilih Remove.
4. Sekarang Restart perangkat Anda.
Selesai!
Available link for download
Friday, March 10, 2017
iROOT Fastest way to root your Android
iROOT Fastest way to root your Android
A few weeks back, i made a post about an app called Root Genius to root your android phones in less than 5 minutes . Unfortunately, some phones give an error: "Tough phone, unable to root". Enter iRoot, the surest and fastest way to root your Android smartphone. The software was developed by a group called XINYI Network. The makers of VRoot software (now upgraded to iRoot)

NB: Rooting may void the warranty of your device. Have a backup of your phone and Follow the procedures strictly as i wont be held responsible for the event of soft or hard brick of your device, bomb blast or plane crash your stubbornness causes.TOOLS
- A PC
- A USB Cable
- iRoot Application - Download from here
- Download and install the iRoot app on your PC
- Connect your phone with USB Debugging enabled
- Allow the iRoot app detect your phone
- Click the ROOT button
- Let the process complete itself
iRoot can root most devices like the latest Infinix hot currently on sale on Konga for just N13,400. You can read about the phones spec here and order for yours today from here with free home delivery.
Questions? Leave a comment below.
Dont forget to share this post by clicking any of the share buttons below!
Available link for download
Thursday, March 9, 2017
How to Root Infinix Zero 4 X574 Using TWRP Recovery Mode
How to Root Infinix Zero 4 X574 Using TWRP Recovery Mode
Infinix Zero 4 is the 2016 Flagship smartphone from Infinix Mobility, and the successor to last year’s Zero 3. Infinix Zero 4 might be the last lead Infinix will dispatch for this year 2016. Zero 4 runs on Android 6.0 Marshmallow Chameleon XOS v2.1.0. It comes with premium features such as Fingerprint scanner, Accelerometer, Gravity sensor, Proximity sensor, Compass and the amazing Battery Life, 16+8MP camera with OIS feature, powered by MediaTek Helio X20 Octa-core processor, 3GB RAM, 32GB internal storage plus micros SD Card support, and lots more.

Grab the Infinix Zero 4 with the Buy Now button Below
 | Infinix Zero 4 |  |
I know you will like to root your exceptional Infinix Zero 4 X574, probably because you want to explore more, but the latest OS, Android M is very stubborn when it comes to rooting, because the popular and easiest apps such as Kingroot, Vroot, Framaroot, Tecnoroot, Rootgenius etc., seems not working for it. The below tutorial will guide the Infinix X574 (Zero 4) users to install TWRP Recovery and Root their Smartphone.
Important Notice
After rooting your phone, it’s advisable to unroot before performing an OTA update or restoring factoring settings. We have a comprehensive guide on that here.
Materials Needed For The Rooting
» PC
» SB Cable - for communication within the smartphone and PC.
» SP Flash Tool - Download it Here
» VCOM Drivers - Downloading link and installation instruction, check here
» TWRP Recovery Image for Infinix Zero 4 - Download it Here
» SuperSU-v2.76.zip - Download it Here
How to Install TWRP Recovery and Rooot Infinix Zero 4 X574» Save the SuperSU 2.76.zip that you downloaded to your phones SD card » Unzip the TWRP zip file that you downloaded and flash the recovery image to the phone using SP Flash Tool
How Can I Flash it Using SP Flashtool? Check out this link for the instruction: www.shelaf.com/2015/09/how-to-flash...
» Now, boot your phone into TWRP Recovery Mode (by Holding the Vol Up and Power button simultaneously for 5 seconds)
» In TWRP, if you get a prompt asking you to swipe to allow modification of the System partition, tap Keep Read Only
» If TWRP offers to root the phone, select NO
» In TWRP recovery, tap Install
» Navigate to the location of the SuperSU 2.76.zip and select it
» Swipe to confirm flashing of SuperSU.zip and wait till flashing is complete
» After a successful flashing go back and reboot.
It is simple as that. You may download Root Checker from Play Store to verify your root privileges. After downloading, simply Install Root Checker, run it and you should get a success message after then.
Available link for download
Saturday, February 25, 2017
Cara Mengubah Tampilan Statusbar Android Tanpa Root
Cara Mengubah Tampilan Statusbar Android Tanpa Root
Memiliki tampilan statusbar yang berbeda dan lain dari yang lain merupakan satu kebanggaan bagi pengguna Android, terlebih jika panel notifikasi bar memiliki tampilan yang unik dan keren. Maka dari itu saya akan memberkan tips untuk merubah tampilan statusbar Android anda tanpa harus melakukan root tetapi hanya dengan menggunakan aplikasi pihak ketiga yang berada di Playstore bernamaAntTek Quick Setting. Aplikasi ini berfungsi untuk edit merubah seluruh tampilan panel notifikasi bar android seperti pada merubah icon wifi, bluetooth, GPS, volume, Sync dan lain sebagainya.

Selain merubah dan menampilkan icon yang ada pada panel notifikasi Statusbar AntTek Quick Settings mendukung cara cepat untuk menginput shortcut seperti aplikasi, kontak, dan lainnya. Aplikasi ini tidaklah menggunakan akses Root, jadi bagi anda yang ingin merubah tampilan panel notifikasi tidak perlu susah payah, Aplikasinya pun tersedia di Playstore dan gratis pula.
Tampilan statusbar Android setelah menggunakan Aplikasi AntTek Quick Setting

Jika tampilan Android anda ingin beda dan keren maka anda bisa download aplikasi Anttek Quick Setting pada link Berikut
AntTek Quick Setting | Playstore
- Untuk Cara Membuat panel notifikasi toggle pada AntTek Caranya cukup mudah yakni anda tinggal pencet tombol + kemudian anda tinggal pilih panel mana yang anda pilih, disana terdapat banyak pilihan. Anda juga bisa menambahkan Aplikasi ke dalam status bar tersebut.
- Untuk memunculkan bar notifikasi bawaan Android, tarik dari bagian pinggir atas layar. Anda juga dapat mengubah posisi penarikan tersebut pada bagian setting AntTek Quick Settings.
Available link for download
Friday, February 24, 2017
HOW TO ROOT ANY STUBBORN MTK TECNO INFINIX e t c devices
HOW TO ROOT ANY STUBBORN MTK TECNO INFINIX e t c devices
Devices these days are getting a reputation for being hard to root. Some apps like Root Genius (you can read about it here) have tried to simplify the rooting procedures. But if your phone falls into the "tough phone, to hard to root" category, dont worry you have come to the right place. Lets get started. This tutorial is only for mtk devices strictly.
TOOLS
=> CWM installed on your phone - You can install CWM on your phone by following the procedure here
=> SuperUser SU zip - Download here

PROCEDURES
=> Copy the downloaded Super SU.zip file to the root folder of the SD card of your phone.
=> Now reboot your phone to CWM, you can try any of the methods listed here
=> Scroll to install zip from SD Card option
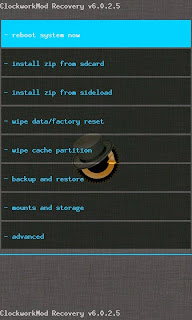

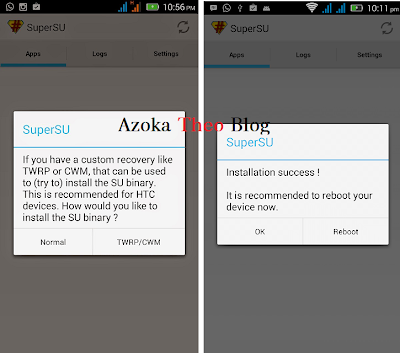
=> After the jargons completes, select reboot system now.
=. And voila!! Your phone is finally rooted.
If this doesnt work for you, click here for another method.

Available link for download
Monday, February 20, 2017
New Latest MediaTek SP Flash Tool v5 1516 MTK Droid Root Tools v2 5 3
New Latest MediaTek SP Flash Tool v5 1516 MTK Droid Root Tools v2 5 3
New Latest MediaTek SP Flash Tool v5.1516

Archive name: SP_Flash_Tool_v5.1516
Archive size: 27 MB
Smart Phone Flash Tool (SP Flash Tool) allows you to flash any stock firmware or any custom ROM on the Android smartphone. Here, we are going to talk a bit about the Smart Phone Flash Tool and its features.
MT657372 Innovative Platform for Mainstream Smartphones
MT6575 Dual-SIM smartphone platform for the mainstream market
MT6577 1 GHz Dual-Core Smartphone Platform
MT6589 Quad-Core Cortex-A7 1GHz+CPU Smartphone Platform
Whats needed:
- USB data cable
- MediaTek USB VCOM drivers (doawnload here, here or here)
- SP Flash Tool

READ ON: How to Root Tecno L5, M3 Mini Gionee Long Awaited For Die Hard Root Users Enjoy
MTK Droid Root & Tools v2.5.3

Download MTK Droid Root & Tools v2.5.3 from here, here or here.
You can also download MTK Droid Root & Tools v2.4.6 & v2.5.2 from here.
How to make a scatter file for Mediatek MTK6582, MTK6595, MTK6589, MTK6592, MTK6577, MTK6589T, MTK6572 devices.
What you’ll need
- MTK / MediaTek based smartphone
- USB Data Cable
- USB ADB VCOM drivers
- MTK Droid Tools
What to do
Step 1 – Enable USB debugging
Step 2 – Install the PDANet USB ADB VCOM drivers HERE
Step 3 – Download, extract, and run the latest version of MTK Droid Tools.
Step 4 – Your phone should be on at this point. Connect the data USB cable to your phone.
Credit to chinagadgetsreviews
Available link for download
Sunday, February 12, 2017
Method to Root Infinix Hot S X521
Method to Root Infinix Hot S X521
Infinix Hot S is one of the newest and hottest device in town and it has been on sell for the past few weeks. It’s known to be the first ever Infinix device feature the Fingerprint sensor (biometric scanner). Infinix Hot S runs Android 6.0 Marshmallow with Infinix XUI out of the box and its visually stunning design, sharp cameras, 3,000mAh battery; a combination of Android operating system, octa core processor and memory expandable to 128GB all for a superior performance. If you wish to explore the definition of “ Hot S” then order it now on Jumia Nigeria.
I know you will like to root your Infinix Hot S X521, probably because you want to explore more, but the last OS, Android M is very stubborn when it comes to rooting, because the popular and easiest apps such as Kingroot, Vroot, Framaroot, Tecnoroot, Rootgenius etc., not working for it. The below tutorial will guide the HOT S users on how to install TWRP Recovery and Root their Smartphone.

Important Notice
After rooting your phone, it’s advisable to unroot before performing an OTA update or restoring factoring settings. We have a comprehensive guide on that here.
Materials Needed For Rooting
» USB Cable - for communication within the smartphone and PC.
» SP Flash Tool - Download it Here
» VCOM Drivers - Downloading link and installation instruction, check here
» Download TWRP for Infinix Hot S ported by Team Hovatek - Download it Here
» SuperSU-v2.76.zip - Download it Here
How to Install TWRP Recovery and Rooot Infinix Hot S x521» Save the SuperSU 2.76.zip that you downloaded to your phones SD card» Unzip the TWRP zip file that you downloaded and flash the recovery image to the phone using SP Flash Tool
How Can I Flash it Using SP Flashtool? Check out this link for the instruction: www.shelaf.com/2015/09/how-to-flash...
» Now, boot your phone into TWRP Recovery Mode (by Holding the Vol Up and Power button simultaneously for 5 seconds)
» In TWRP, if you get a prompt asking you to swipe to allow modification of the System partition, tap Keep Read Only
» If TWRP offers to root the phone, select NO
» In TWRP recovery, tap Install
» Navigate to the location of the SuperSU 2.76.zip and select it
» Swipe to confirm flashing of SuperSU.zip and wait till flashing is complete» After a successful flashing go back and reboot.
It is simple as that. You may download Root Checker from Play Store to verify your root privileges. After downloading, simply Install Root Checker, run it and you should get a success message after then.
All Credit goes to Team Hovatek.
Available link for download
Saturday, January 21, 2017
Root Browser 2 2 3 APK File Manager Free Download
Root Browser 2 2 3 APK File Manager Free Download
You are downloading latest and updated version 2.2.3 root browser file manager APK and use it all features. This version can edit and can view any file on your android OS version device. You can download and install files and Apks through internet. This latest version root browser allows you to search the files and folders on your android device. Now you can easily managing your file on your android device deleting and erasing of files are now more easy because of root browser apk.
 |
| Root file manager APK |
Here below is some key features OR key functions for Root browser apk full and latest version. See below.
Key features for Root browser:
- Now root browser apk is easy to install.
- Easy to download.
- Spyware free.
- Malware free.
- Virus protected.
- Always available on our official site apk roots.
- Send files and folders through email.
- Execute scripts as you like.
Download root browser apk
Available link for download