Wednesday, March 15, 2017
How to bypass etisalat free social me browsing
How to bypass etisalat free social me browsing
HOW TO BYPASS ETISALAT SOCIALME SPEED THROTTLING (30KBS)
Firstly you have to be on etisalat social me pack not (chat pack) because you cant bypass the speed throttle with chat pack plan.
If you dont known about free social me browsing click here

=> First for all switch off your data connection and force close/stop tweakware, psiphon, openvpn or simple serve.
=> Now switch on your data connection again open your whatsapp app and chat on group or your friends for just 1 minute after that minimize your whatsapp
=> Then lunch your instagram and tap on the "search" button and keep refreshing it while monitoring your internet speed meter downloadable on playstore.
=> Make sure it goes above 100 KB/s as you refreshed, if not, switch off the data and it it back on again.
=> Keep refreshing the search button again until the speed surpass 100 KB/s with speed meter
=> once you exceed 100kb on the speed meter, quickly minimize and run your psiphon or tweakware and blast away your downloads.
NOTE: If your download speed is Higher than 60kb/s, That means you already bypassed the speed throttling
Available link for download
Tuesday, March 14, 2017
How To Download Videos and Pictures from Instagram
How To Download Videos and Pictures from Instagram
If you are looking for how to download photos/videos from Instagram, you have come to the right place. Instagram has grown in leaps and bounds since its launch a few years ago. Instagram has been the springboard for the rise to fame of budding Nigeria comedians like Craze Clown, Akanm d boy and Twyse thanks to the video sharing feature. Unfortunately, Instagram still doesnt support downloading pictures or videos via the app despite the continuous roll out of new features. Below is a step by step tutorial for both Android and non-android users.
 |
| Source: Forbes |
STEPS FOR DOWNLOADING VIDEOS & PICTURES FROM INSTAGRAM
Android Users
- Download iGetter from the Google playstore (Check end of post for download link)
- Open Instagram App
- Tap the three vertical dots on the photo/video you want to download (See Image)
- Select "Copy share URL"

- Open iGetter App
- Paste the link in the space provided
- Click Download and wait for it to finish.
- Now you have successfully downloaded photo/video from Instagram
NON ANDROID USERS
- Open Instagram App
- Tap the three dots on the photo/video you want to download
- Select Copy share URL
RECOMMENDED: How To Download Videos From Twitter
- Go to this website here (Bookmark/Save the Page for next time)
- Paste Link in Box provided (See Image below)

- Click Download
If you face any difficulty or you have another method you use, leave a comment below!
Download Links
iGetter For Android
Instagram for Android
Available link for download
Sunday, March 12, 2017
How To Switch to 4G LTE in Nigeria MTN GLO NTEL ETISALAT
How To Switch to 4G LTE in Nigeria MTN GLO NTEL ETISALAT
In less than a week, ETISALAT, MTN and GLO have officially launched their 4G LTE network across Nigeria. It seems Nigerias quest to achieve 30% (thirty percent) broadband penetration by 2018 might actually become a reality. Nigerians can now finally access super fast mobile internet service for the first time in a very long time. With 4G LTE now available to different parts of Nigeria, you can now enjoy the speed of broadband internet directly on your mobile device. Its time to throw your Swift/Spectranet/Smile modem to one corner. Lets get started.
")
NOTE
Before you think about switching to 4G LTE, you must have a 4G enabled device. The device must support band 700/800/1800/2100/2600MHz frequency. Just check the phone specification to make sure it supports the band. If you dont have a 4G LTE enabled device, you can check here for the cheapest and most affordable 4G LTE phones.
HOW TO SWITCH TO 4G LTE
MTN
")
GLO
")
NTEL
")
ETISALAT
Etisalat 4G LTE is the simplest to switch. If you have a 4G enabled device, just go to settings and change your network to 4G and start enjoying the speed. Meanwhile, Etisalat just increased the prices of their data plans. You may want to check them out before you decide to switch.")
Still dont know which network to choose? Well, if you are looking for cheaper data plans, choose GLO 4G LTE. If you are a power user and need unlimited internet, just pick NTEL. But if you are looking for reliability and speed, just go with MTN and Etisalat 4G LTE respectively.
For those who dont have a 4G enabled device, I am compiling a list of the most affordable 4G LTE phones. Just subscribe to our newsletter so you dont miss out on the list. Meanwhile, you can check out Infinix Hot S or Infinix Zero 3. They are 4G LTE enabled and are relatively affordable too.
Which 4G LTE network are you switching too? Let me know, drop a comment.
Available link for download
How to successfully root your Tecno Camon C9 in easy steps
How to successfully root your Tecno Camon C9 in easy steps
Rooting is a process of gaining privileged control (known as root access) over various Android subsystems. Android rooting opens up a world of possibility, but it can also void your warranty, or even leave you with a bricked device. So today, we’re going to be taking about how to root this phone “Tecno Camon C9”. One of the latest device from Tecno mobile, unveiled some couples of months ago, and was tagged the selfie king. The phone has been proving stubborn to root probably because it’s running on Android 6.0 Marshmallow. But all thanks to Hovatek Teamfor making this possible.

Requirements for the rooting process
?Your patience in following the steps involved
? Download CWM recovery image Ported by team hovatek
? Super SU.zip
?Fastboot and adb
? Unlocking the boot-loader of Tecno Camon C9 follow the steps here
Steps for Rooting Tecno Camon C9
1. Copy the downloaded Super SU to both internal storage of your phone and SD card.
2. Now extract and copy the CWM recovery.imginto the same folder as the fastboot.exe andadb.exe
3. You must have unlocked the bootloader of your Camon C9 or follow this steps to do so.
4. Connect the phone to your PC via USB cable while switched ON and boot it into Fastboot (as instructed in the Bootloader unlock guide step 3 above)
5. The moment your device enters fast boot, flash the recovery.img to the phone by typing this command below
fastboot flash recovery recovery.img
on your PC then pressing Enter.
6. Reboot the phone by typing the command below
fastboot reboot
then pressing Enter
7. Boot the phone into recovery mode by switching off and pressing Volume up button Power button all together
8. Once you enter recovery mode, use the volume button to move up and down
9. Scroll down to Install zip and select it
10. Select Choose zip from /storage/sdcard1
11. Navigate to the location of SuperSu.zip and select it
12. Select Yes – Install SuperSU to confirm flashing
Wait till the flashing is complete.
13. Return to the home screen (using the back option) then select Reboot
Note: If CWM offers to fix some errors, select No. Once you are done, confirm if your device has been successfully rooted by installing root checker.

Available link for download
Saturday, March 11, 2017
HOW TO MAKE MONEY ON KONGA JUMIA AFFILIATE PROGRAM
HOW TO MAKE MONEY ON KONGA JUMIA AFFILIATE PROGRAM
Affiliate marketing is not a new thing for people who know a little about making money online. It is a type of performance-based marketing in which a business rewards one or more affiliates for each visitor or customer brought by the affiliates own marketing efforts. The industry has four core players: the merchant (also known as retailer or brand), the network (that contains offers for the affiliate to choose from and also takes care of the payments), the publisher (also known as the affiliate), and the customer. You can read more on affiliate marketing on Wikipedia here
Konga like most top marketing website also offers a money making opportunity through their affiliate marketing channel. All you need to do is to create an account to sign up to be an affiliate and in return, you would be given personalized links and banners for you to post anywhere (blog, Facebook page, twitter, Instagram e.t.c) and you would be rewarded for clicks generated. The interesting part is that for any purchase made by anybody via your referral link, you get a commission starting from between 3% and 11% depending on the goods purchased which can be wired directly to your bank account without any hitch.


UPDATE: Join the Jumia Affiliate program and earn more money. Click here to sign up for the Jumia Affiliate Program
Need help? Drop a comment and we would be glad to help.
Available link for download
How To Permanently Delete Files From Windows PC Laptop
How To Permanently Delete Files From Windows PC Laptop
If you think you know how to permanently delete files and folders, think again. Do you know that whenever you delete a file from your PC, it doesnt delete permanently. It stays hidden somewhere deep inside your hard drive. Using different paid and free file recovery softwares, the file can easily be recovered.. Whether you delete by pressing "delete" or "Shift + Delete" or "Empty Recycle Bin", that file is still somewhere inside your hard drive waiting for someone to bring it out of hiding.

HOW TO DELETE FILES PERMANENTLY ON WINDOWS PC USING FOLDER SHREDDER
- Open the App
- Click Browse and select the file/folder you want deleted
- Click Start Shredding
- Wait while it shreds the file
- Your file is now permanently deleted.

Available link for download
How to download facebook videos easily
How to download facebook videos easily
Facebook is undoubtedly the largest Social Media platform in the world for social networking among heavyweight companies, medium industries, startups, one man business owners, politicians, music, movie and football stars, religious organizations and me and you.
![]()
In fact, any body that is using an internet enabled phone and he or she is not on Facebook is seen as an outdated fellow. The social media platform has gone from strength to strength after it was launched more than 11 years ago.
We have enjoyed many interesting features on Facebook including the data call, video call, photo sharing, Facebook groups, pages, Facebook Messenger chats and lots more.
Facebook is even competing with YouTube right now on the video sharing features. YouTube is the biggest video sharing social media platform at the moment but Facebook is diving into that aspect by providing new improved video options like increasing the length of shared videos and even allowing users to use video as their profile
Unfortunately, users on Facebook are not able to download videos they like in other to watch it later on their phones and that is why i came up with this article on how you can start downloading Facebook Videos that you came across on Facebook to your android devices, ios devices and laptops.
I was using Internet Download Manager (IDM) to download interesting Facebook Videos before now, but that is only achievable on PC but on this article, i will show you three (3) methods you can utilize to use to download any Facebook video to your phone and PC .
HOW TO DOWNLOAD FACEBOOK VIDEOS IN ANY DEVICE
This method of downloading videos on Facebook works on all devices and even java phones. It is a similar method used when trying to download YouTube videos on any device. I will show you examples and sites that you can make use of to achieve this simple task. The only thing yku need to do is to copy the link of that particular video you want to download and paste it on the sites i will show you below and the download link will be generated for you. Follow me along...
First Example
Using fbdown.net
==> Go to fbdown.net, look at the field and paste the link of the video you want to download as you can see from below screenshot.

==> Now, click on download, the video download link will be provided for you. One interesting aspect is that you can choose to download either normal quality or High definition quality as you can see below. This will help you in times of data management because the higher the video quality, the more data it will consume to download it.
Available link for download
Thursday, March 9, 2017
How to Transfer Contacts from Samsung to Galaxy C5 C7 C9
How to Transfer Contacts from Samsung to Galaxy C5 C7 C9
The C series is launched by Samsung only for the Chinese market. The three models have different sizes, all used ultra-thin metal unibody design. Different from the previous, the price of Samsung C series is more youth and has a more suitable performance for the young, those advantages let it insert into the mid market directly.

Well, have you prepare to buy a Galaxy C9? I think the first thing you want to do after buy one is transfer the contacts from your old Samsung to it. But we usually store many contacts data in our old phone, if we want to re-enter it to our new C9, it would be a very troublesome thing.
Therefore, have something can help us to do it easily?
Mobile Transfer is a useful tool for transferring data. It can transfer photos, text messages, videos, calendar and many other file types between Winphone, Android, iOS and Symbian and the data would not have any loss. Besides, Mobile Transfer can backup ? restore your data and erase your old phone.


Steps to Transfer Contacts from Samsung to Galaxy C5/C7/C9
Step 1. Launch Mobile Trans and Choose the Mode
First of all, launch Mobile Trans and it will show you a window with some modes. Select the "Phone to Phone Transfer".

Step 2. Connect your Device
Then connect your two devices to computer with USB cables. The left side should be the source phone and the destination phone is on the right side. If you want to exchange their position, just need to click "Flip" button.

Step 3. Choose the Data and Transfer them
Now, choose the data you want to transfer to your new device by checking the box in front of them and then click the "Start Transfer" button. Whats more, you can check the "Clear Data before Copy" box if you want to erase the new device before transferring.

More info:
http://pinkberrylicious.blogspot.com /2016/07/transfer-contacts-from-android-samsung-to-c5.html">Transfer Contacts from Android Samsung to Samsung C5
http://pinkberrylicious.blogspot.com /2016/07/transfer-photos-videos-from-samsung-to-c5.html">How to Transfer Photos Videos from Samsung to Galaxy C5
http://pinkberrylicious.blogspot.com /2016/09/transfer-contacts-to-samsung-c9.html">Transfer Photos Videos from Samsung to Galaxy C9
http://pinkberrylicious.blogspot.com /2015/11/transfer-data-contacts-from-samsung-to-j3.html">How to Transfer Data Contacts from Samsung to Galaxy J3/J5/J7
Available link for download
How to Root Infinix Zero 4 X574 Using TWRP Recovery Mode
How to Root Infinix Zero 4 X574 Using TWRP Recovery Mode
Infinix Zero 4 is the 2016 Flagship smartphone from Infinix Mobility, and the successor to last year’s Zero 3. Infinix Zero 4 might be the last lead Infinix will dispatch for this year 2016. Zero 4 runs on Android 6.0 Marshmallow Chameleon XOS v2.1.0. It comes with premium features such as Fingerprint scanner, Accelerometer, Gravity sensor, Proximity sensor, Compass and the amazing Battery Life, 16+8MP camera with OIS feature, powered by MediaTek Helio X20 Octa-core processor, 3GB RAM, 32GB internal storage plus micros SD Card support, and lots more.

Grab the Infinix Zero 4 with the Buy Now button Below
| Infinix Zero 4 |
I know you will like to root your exceptional Infinix Zero 4 X574, probably because you want to explore more, but the latest OS, Android M is very stubborn when it comes to rooting, because the popular and easiest apps such as Kingroot, Vroot, Framaroot, Tecnoroot, Rootgenius etc., seems not working for it. The below tutorial will guide the Infinix X574 (Zero 4) users to install TWRP Recovery and Root their Smartphone.
Important Notice
After rooting your phone, it’s advisable to unroot before performing an OTA update or restoring factoring settings. We have a comprehensive guide on that here.
Materials Needed For The Rooting
» PC
» SB Cable - for communication within the smartphone and PC.
» SP Flash Tool - Download it Here
» VCOM Drivers - Downloading link and installation instruction, check here
» TWRP Recovery Image for Infinix Zero 4 - Download it Here
» SuperSU-v2.76.zip - Download it Here
How to Install TWRP Recovery and Rooot Infinix Zero 4 X574» Save the SuperSU 2.76.zip that you downloaded to your phones SD card » Unzip the TWRP zip file that you downloaded and flash the recovery image to the phone using SP Flash Tool
How Can I Flash it Using SP Flashtool? Check out this link for the instruction: www.shelaf.com/2015/09/how-to-flash...
» Now, boot your phone into TWRP Recovery Mode (by Holding the Vol Up and Power button simultaneously for 5 seconds)
» In TWRP, if you get a prompt asking you to swipe to allow modification of the System partition, tap Keep Read Only
» If TWRP offers to root the phone, select NO
» In TWRP recovery, tap Install
» Navigate to the location of the SuperSU 2.76.zip and select it
» Swipe to confirm flashing of SuperSU.zip and wait till flashing is complete
» After a successful flashing go back and reboot.
It is simple as that. You may download Root Checker from Play Store to verify your root privileges. After downloading, simply Install Root Checker, run it and you should get a success message after then.
Available link for download
Wednesday, March 8, 2017
How To Use Instagram Stories The Snapchat Killer
How To Use Instagram Stories The Snapchat Killer
Just when we thought Snapchat has left Instagram kissing the dust with no hope of the latter meeting the former in the photo/video sharing battle, the Facebook owned Instagram have decided to roll out their own version of what made Snapchat the popular app it is today by introducing a new feature called Instagram stories. Instagram stories basically allows you to post a picture or video and it can only be viewed by those you choose for only 24 hours after which it disappears forever.
This is basically what Snapchat App is all about. Even the name is a direct copy from Snapchat stories. It only shows how the Mark Zuckerberg owned brand is willing to push back to the top of the food chain. If you cant buy them, just copy them.
HOW TO USE INSTAGRAM STORIES
Before you start, you need to make sure that your Instagram app is updated to the latest version. Check at the end of this post for download links.
=> Open your Instagram app and tap he plus button on the top left-hand corner of your screen
=> This will turn on the story camera which you can use to take the picture or video yu want. You can also upload existing pictures and videos from your device too.
=> Take the picture/video or upload existing ones.
=> Edit the picture using new tools added (there are three types of pens you can use to make drawings or doodles)
=> Tap the Done button to save your story and tap the checkmark button to share the story.


HOW TO HIDE INSTAGRAM STORIES
=> Go to your profile and tap the button on the top right hand of your screen
=> Tap Story Settings
=> Tap "Hide my story from.." and adjust the settings as you wish and tap done.
You can also adjust people who comment to only those you follow, everyone or nobody.
With this new feature, Instagram has declared an all out war against SnapChat which will make a very interesting battle to watch. The battle line has been drawn. Instagram stories versus Snapchat Stories. Snapchat is probably somewhere just telling themselves: "Well, at least we have the dog filter and the flower crown filter. Who stories epp?" :-)
Download Instagram for iOS and Android
Available link for download
Monday, March 6, 2017
How To Get Konga 5 Discount off Every Order with KongaPay
How To Get Konga 5 Discount off Every Order with KongaPay
Konga is one of the two popular online shopping malls in Nigeria. Founded in July 2012, the company recently celebrated its 4th year anniversary last months. Konga is arguably the largest online shopping mall with several thousand merchants selling to almost half a million visitors to the Konga website daily looking for phones, electronics or Fashion items. They hope to be the Alibaba of Africa in the nearest future (Read more about Konga here ). Konga has its own standalone payment platform called KongaPay, which allows you pay seamlessly for transactions whether on Konga.com or any third-party website.
WHAT IS KongaPay?
KongaPay is a safe and secure online payment method created in partnership with Nigerias leading Banks (19 Banks) to ensure trust and safety for goods bought on Konga or any other verified third-party merchant.

WHY SHOULD I USE KongaPay?
=> You get 100% buyer protection on Konga. You receive your funds instantly if goods are damaged, failed to arrive or different from what was described.
=> It is 100% safe, every transaction is triggered by a code sent by your bank, so you can always monitor any transaction and get instant refunds.
=> Transaction details are encrypted and only communicated between the platform and your bank without any third-party service like most payment methods.
=> You get 5% discount on every item you buy on Konga for life.
`
Partner Banks:

HOW DO I SIGN UP FOR KongaPay?
=> If you dont have a Konga Account, click here to register
=> If you have a Konga Account just visit the KongaPay website and Login.
=> Login to your Account and select your bank
=> Enter your Personal and Bank information.
=> Anytime you want to pay for an order, your bank automatically sends you a code which you enter to complete transaction.

Konga Pay is a very secured, fast and seamless way to pay for goods bought on Nigerias largest shopping mall, Konga. The greatest thing is you get 5% discount on every item you purchase through KongaPay. You can also buy recharge cards on KongaPay and get 5% discount i.e. you pay N95, N190 when you buy a recharge card worth N100 and N200 respectively!! Just login or create your Konga account and start enjoying the 5% discount on every order.
Checkout the KongaPay Video below:
You can also earn a lot of money from Konga with your website or social media account by joining the Konga Affiliate Program. You also get free N500, when you register for the affiliate program. Check here for details on how to join.
Do you want to see all the daily deals and latest money saving discounts on Konga? Checkout Deals9jaAre you using KongaPay? Tell us your experience in the comment box below. Id publish a tutorial soon on how you can receive payments on your Blog or Website in Naira with KongaPay (No Setup fee required). Dont forget to share this post with your friends by clicking the social media buttons at the top of the page or by the left side.
Available link for download
Sunday, March 5, 2017
How To Verify any Bank Account Number in Nigeria
How To Verify any Bank Account Number in Nigeria
Let us imagine three scenarios:
1.You want to send money at the ATM, then you are unsure of the account number, you now have to call/WhatsApp/Ping the owner of the account to confirm but everybody at the ATM queue is screaming at you. You just stand here wondering why bad things happen to good people.
2. You are at the bank, you want to send money to someone, you are unsure of the account number, so you head up to the customer care section but there are about 20 people on the queue there too. *deep sigh*
3. You want to use the mobile banking app on your phone to transfer money, for some reason the app doesnt verify the account number for you, you decide its better to just postpone it and confirm later.
This has to stop. Theres a solution to all these problems. Its an app called Nigerian Bank Account Verifier.


HOW IT WORKS:
=> Download the App (Check download link at the end of the post)
=> Install the app and Open it
=> Select the bank name
=> Enter the 10 digit Account Number
=> Click Verify
=> It will show you the Account Owners full names.
WHY YOU SHOULD USE IT:
=> Prevent Identity theft
=> Prevent Scam, find out real owners of account numbers.
=> Save yourself the stress of facing above scenarios
=> Prevent sending money to someone elses account.
Recommended For You:
=> How To Find PostCode/Zip Code in Nigeria
=> How to Check BVN on Phones in Nigeria
This is a very nice app, and i recommend it for everyone. Personally, its a life saver app. The only issue is that its only available for Android devices for now, hopefully the developer will add other platforms to the list soon.
Download Account Verifier from Google Playstore Here (or from Alternative Fast Mirror here)
Available link for download
How I exported my iPhone phone contacts to my Android phone
How I exported my iPhone phone contacts to my Android phone
Hmmm! My head going and thinking in 36degree, dont know if am to out from iPhone may be iPhone7 to android;any of the latest Android phone atall, well to say both are awesome in appearance, designs and functions, unique in there specific way, both are smart and it smartens the life of the holder(permit me to say so)

Now my question to you is"do you want to put from iPhone to ios" if Yes you say then I guess sure that there are some things you dont want to be left behind ,videos, photos, contacts, music, browsing history, to mention but the few.
Now, I want to hold it down to you, my friend; "how you can transfer your iPhone contact to your Android phone, I can hear you say its impossible, doubt not because its 1001% possible.
Now with the tutorial below, be ready to export your vCard to your Android phone.
What is vCard?, in other word known as virtual electronic card tagged vCard, this vCard is found in your iCloud contacts and it carries your personal contact information or more contacts, this vCard can be attached to email so that one can share it with friends and associates.
Eehmm!, before you read the below tutorial I advice you to backup iPhone contacts iCloud account.
How to export your contacts from vCard.
Launch your PC or mac internet browser, on the address bar input iCloud.com and sign in using your apple ID.
Not this does not work with Google chrome browser. So you should make use of browser like Firefox or Safari.

Click on contacts, look at the top left corner of your screen and click on All contacts.
On your keyboard click the command+A key if you are making use of Mac, if you are making use of PC click the control(ctrl)+A key using the keyboard.
Now locate the setting icon(it is a gear icon) at the left down corner of the screen.

Now click on Export vCard all your contact in a new opened window screen will be saved as .vcf fine in your downloaded file location, select all your contacts, right click and Export
How to import contacts via Google Contacts
Now we are trough with the first step, now we move to the second step. One good news about this second step is, you dont need a special internet browser for this, you allowed to make use of any browser.
You will have to import your vCard via Google, to do this you must have a Gmail a account, just like in step one during export you signed in with your Apple ID, this one you will sign in with your Google email address(Gmail)
Open your internet browser, on the address bar input Gmail. Com. Now input your email address(if you dont have create one).

On the right bottom of the screen, ...click or tap on Contacts.
On the left bottom of your screen, click on the import option, next click on "Choose file". Yeah! Keep it up we are almost done.
Now locate the vCard(remember it was saved as a .vcf file in your computer download), or locate it in any where.

Now click Import.
In some seconds of delay, every of your contacts will be displayed on your computer screen. If any red message pops at the top of your screen, you can now click on find and merge duplicates.
Wow!, We made it, what a tutorial of successful trial, hope you did urs with out error if yes comment using the comment box kg no tell me i will help out, am a humble servant to you all. Thanks.
posted from Bloggeroid
Available link for download
Saturday, March 4, 2017
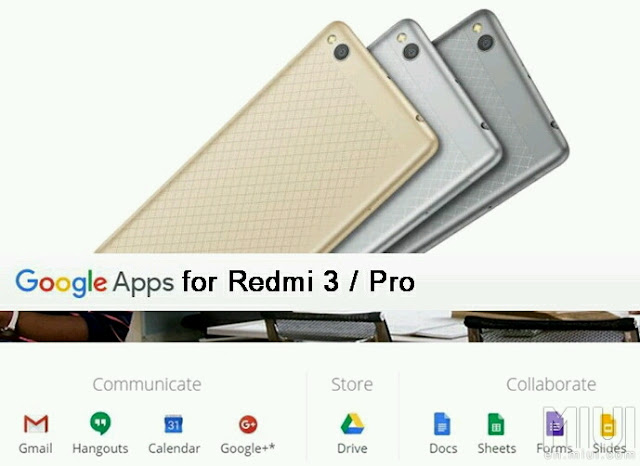
How to Install Google Play store for Redmi 3 Pro China ROM
How to Install Google Play store for Redmi 3 Pro China ROM
Redmi 3 is a great phone, yet we need Google Play Store, which is not available with the China Stable and China Developer ROM. This a pictorial guide to make it a breeze with installation.
IMPORTANT: Before even going any further, please make sure you enable your settings for installing a 3rd party APK files. Installing APK click the following link: Installing APK file on your Redmi Note 2 for noobies
Features:
Updated V2 of the popular Google Installer by Eric Xiang.
Supports Kitkat, Lollipop & Marshmallow
Easy installation.
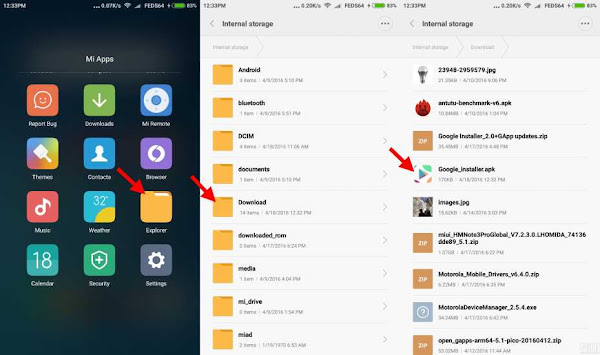
FROM YOUR DEVICE:
Just SCAN using your QR scanner to get Google Installer_2.0:

FROM YOUR PC / COMPUTER:
1. Click the flashing Google Installer Icon to download the “Google Installer”.

2. Unzipped and transfer the Google Installer to the internal memory of your Redmi 3 via USB connection.
3. Just follow thru’ the sequence like the illustrations below. Goto File Explorer > APKs > "Google Installer.apk”
4. Launch the Google Installer icon. Click Blue Circle to start the installation and follow the sequence as shown below:-
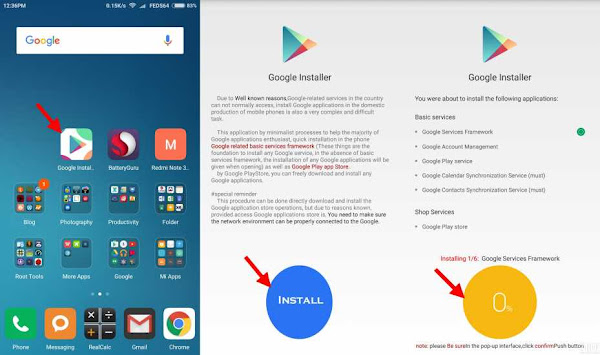
Note: Just click OK and Install, do not click launch at anytime during the installation of the apps.
5. Towards the end of the installation, just follow the illustration to click the RED CIRCLE. and accept the terms, click Allow Google to read SMS, finally go thru the setup of Google sign-in, as follows:-
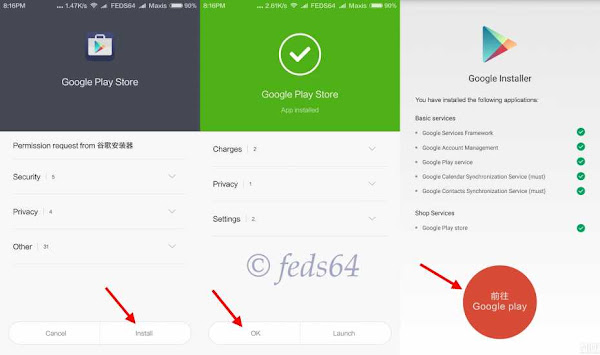
6. As you can see your phone is busy syncing the contact and other Google Apps and wait depending on your WiFi / Data connection for it to update the core applications before even signing to Google Play Store to avoid getting errors.
Note: For those using Development ROM, Goto Downloads > 3 dots on the top right hand corner > Settings > Unlimited, to avoid not download when you are on Data connection.
7. Now you can go with the signing-in to Google and you could now check the Build version. Google > Settings > scroll up towards the bottom, as shown below:-

8. Now, you have successfully installed Google Playstore.
CREDIT:
Eric Xiang - Google Installer_V2
Source
Available link for download
Friday, March 3, 2017
How is Android 6 0 mashmallow treating you
How is Android 6 0 mashmallow treating you
With every Android device upgrade to 6.0, the internet fills up with hoards of angry people complaining bitterly about the downside of the Marshmallow upgrade ranging from battery drainage, contacts disappearing etc. and some are even willing to downgrade back to Android 5.1 while others choose to remain and wait for a bug fix.
So many users are already rocking Android 6.0 Marshmallow. Is it everything you were expecting it to be? Fingerprint support, granular app permissions, Android Pay, energy optimizations and Google Now on Tap are only a few of the new features in the Marshmallow update.
One of the features I love so much about Android 6 Marshmallow is the doze mode, which puts apps to sleep when it recognizes phone inactivity for extended periods of time, hence saving massive amounts of battery.
Those of you that have upgraded to Android 6. Marshmallow, what are your experiences, good or bad? And those still stuck with Lollipop, or Kitkat why haven’t you upgraded?

Available link for download
Wednesday, March 1, 2017
How to Change your BlogSpot Blog Post Permalink and still Retain the old Permalink Valid
How to Change your BlogSpot Blog Post Permalink and still Retain the old Permalink Valid
All individual blog post have a permalink that differs from that of any blog post in the web today. It is unique in the way it is made.
Read:Regain Access to your hacked Facebook Account
Now how do we change or edit a published blog post permalink? Doing this is a capital yes effective and online need your attention on this post.
But before I take you along I would like to give you an example of what permalink looks like.
Read an Example Below
Below is the permalink of one of my blog post . Now I feel like it is too long and I want to change it.
STEP 1
All i did is convert the link below
https://legendtechny.blogspot.com/2016/09/get-free-blogspot-blog-using-blogger_7.html
To
https://legendtechny.blogspot.com/2016/09/free-blogspot-blog-on-blogger_7.html.
Now looking at the second permalink, I only used key words to make it much short for search engine to display.
How to change a blog post permalink with out breaking the existing link.
Login to your blogger Dashboard, click on post>all.
The list of all your blog post will be displayed on your screen, mark the post you want to change the permalink and click on Revert to Draft.

Use the Edit mode to open post.

Locate the permalink option at the Right mid side of your screen, click on it and select costom.
On the blank box manually input the phrase you want to use as you blog title.
Now click on Publish.
STEP 2
To setup Permalink Redirection
Now if u visit the old parmalink
https://legendtechny.blogspot.com/2016/09/free-blogspot-blog-on-blogger.7.html.
A 404 Error message will display on your screen.

On your blog Dashboard, on the bottom left side of your screen, click on setting> Search Preferences. Under Errors and Redirection > Custom Redirects, click Edit.

If you have made a previous Permalink redirection, you have to click on the "New Redirect" button to make a new URL redirection.
Read:4 must things to do before buying a new laptop or pc.
In blank box written "From" input the old changed URL, then in the box "TO" input the new URL gotten from changing the the old URL.

...see example below.
From: /2014/07/free-BlogSpot-blog-on blogger_7.html
To: /2014/07/blogspot-blog-on-blogger_7.html
Select the ‘Permanent’ check box.
Click Save to Save Changes.

*Read:How to add Masonry grid view on Blogspot Blog Post
Why do we add Redirection.
You might have share the URL of a post in some social network or shared it to friends, for them not to get 404Error message you have to add a URL redirection.
posted from Bloggeroid
Available link for download